Preschool Documentation For Beginners
I love documentation! It’s kind of a silly thing to say, but as a teacher documentation is something that I will always and forever include in all of my classrooms. There are a few different reasons for this;
- Documentation shares the story of the work that children are doing in the classroom. How often do you hear a parents remark that their children claim that they do nothing at school all day? The documentation that I have hanging in my classroom shows parents exactly what we’ve been working on, so that they can be sure that they’re children are doing a lot more than “nothing” all day.
- Documentation gives me another opportunity to show how classroom activities are aligned with early learning standards. When parents stop to look at the photos and read the description of the activity and the outcomes, they also note the standards listed.
- Documentation serves as a reminder to children of previous investigation. Children are constantly making new connections between concepts and ideas, and the opportunity to revisit previous experiences, even through photographs, can trigger new questions and ideas.
- Documentation gives me the opportunity to review the children’s thoughts, questions, and ideas, and plan activities and investigations accordingly. Seeing the evidence of the children’s work all over the classroom helps keep me accountable and ensures that I am following the children’s lead and planning investigations that are aligned with their interests.
- Posting documentation in the classroom lets my students know that I value their work enough to make it available for all to see.
Documentation tells the story of the children’s learning. This means that anything that shows evidence of the learning process can be considered documentation.
Documentation generally falls into two categories;
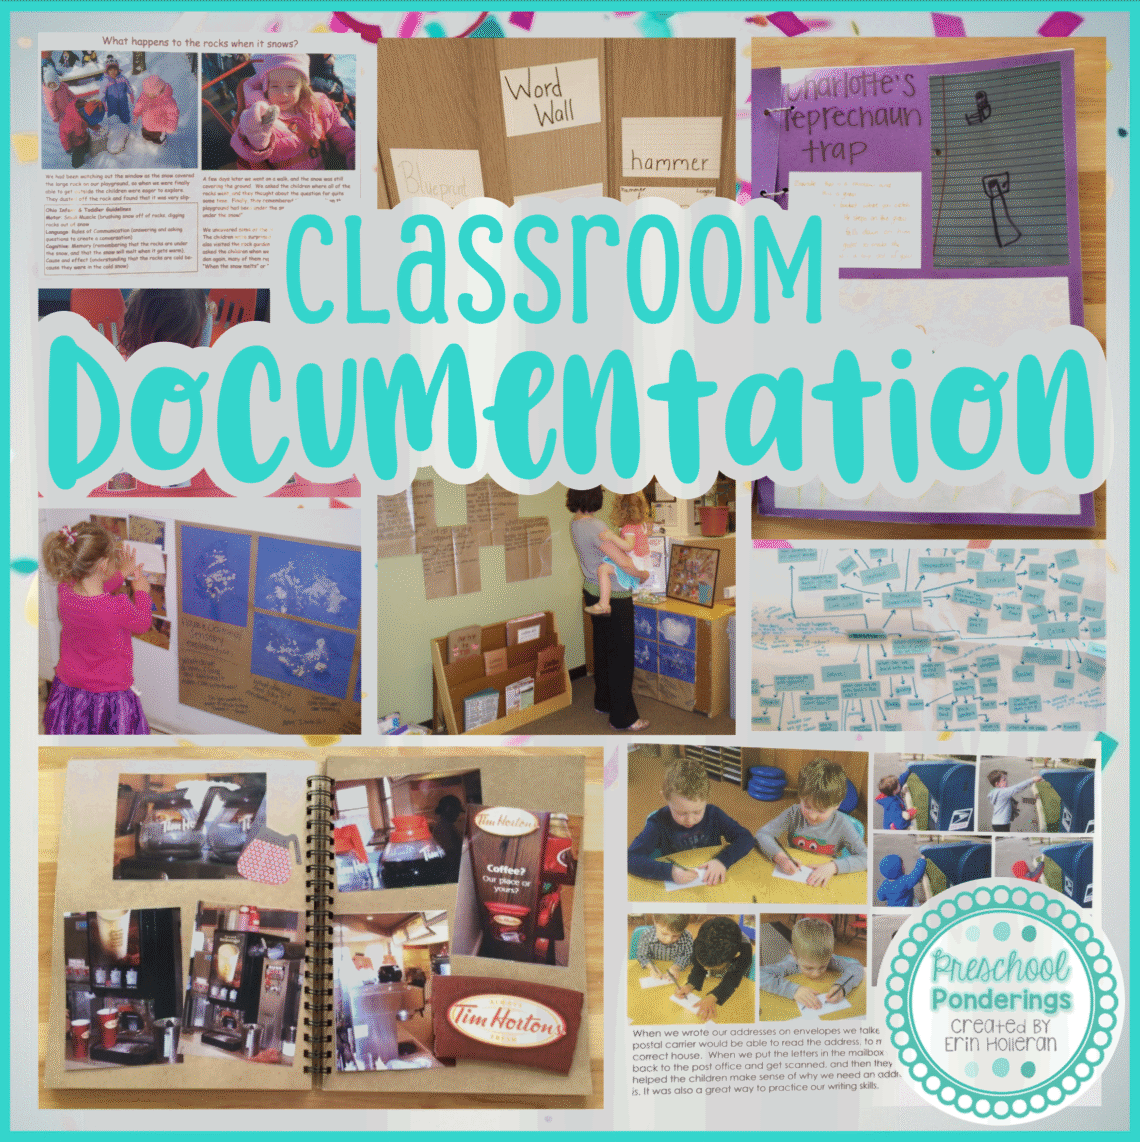
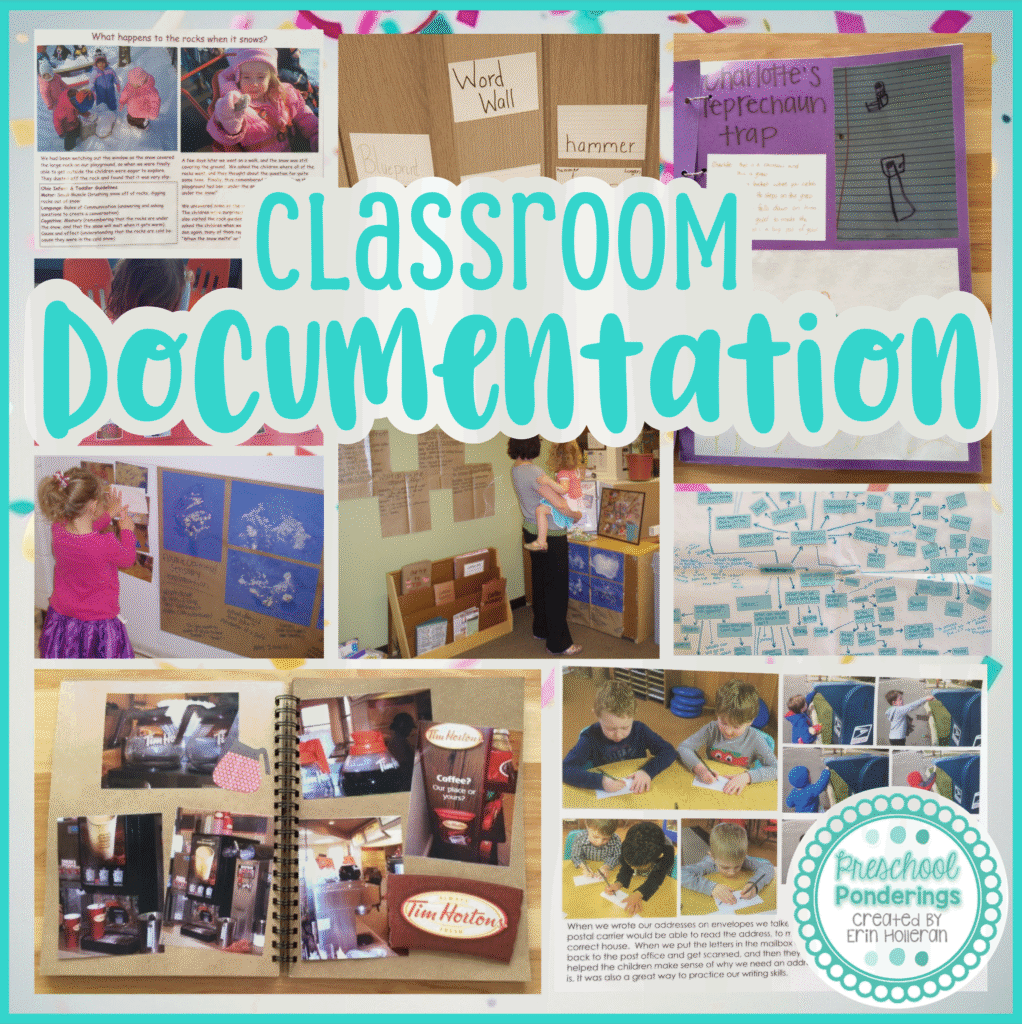
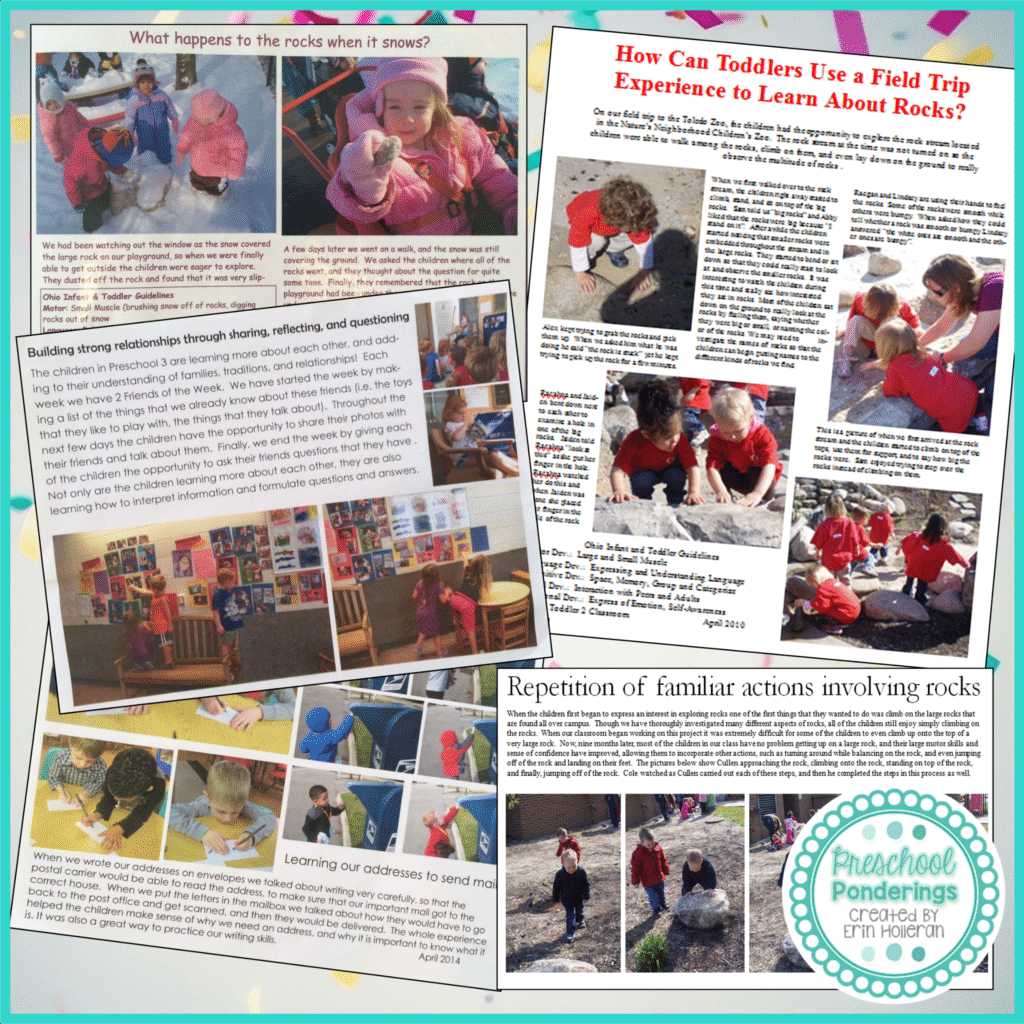
- Documentation Panels: These are professional works created by a teacher to showcase specific learning experiences. They generally include photos taken by the teacher during the investigation and captions or a description of the experience. Panels are created to be aesthetically pleasing and to draw the viewer’s eye to the most significant learning that has taken place, sometimes called the “aha! moment”
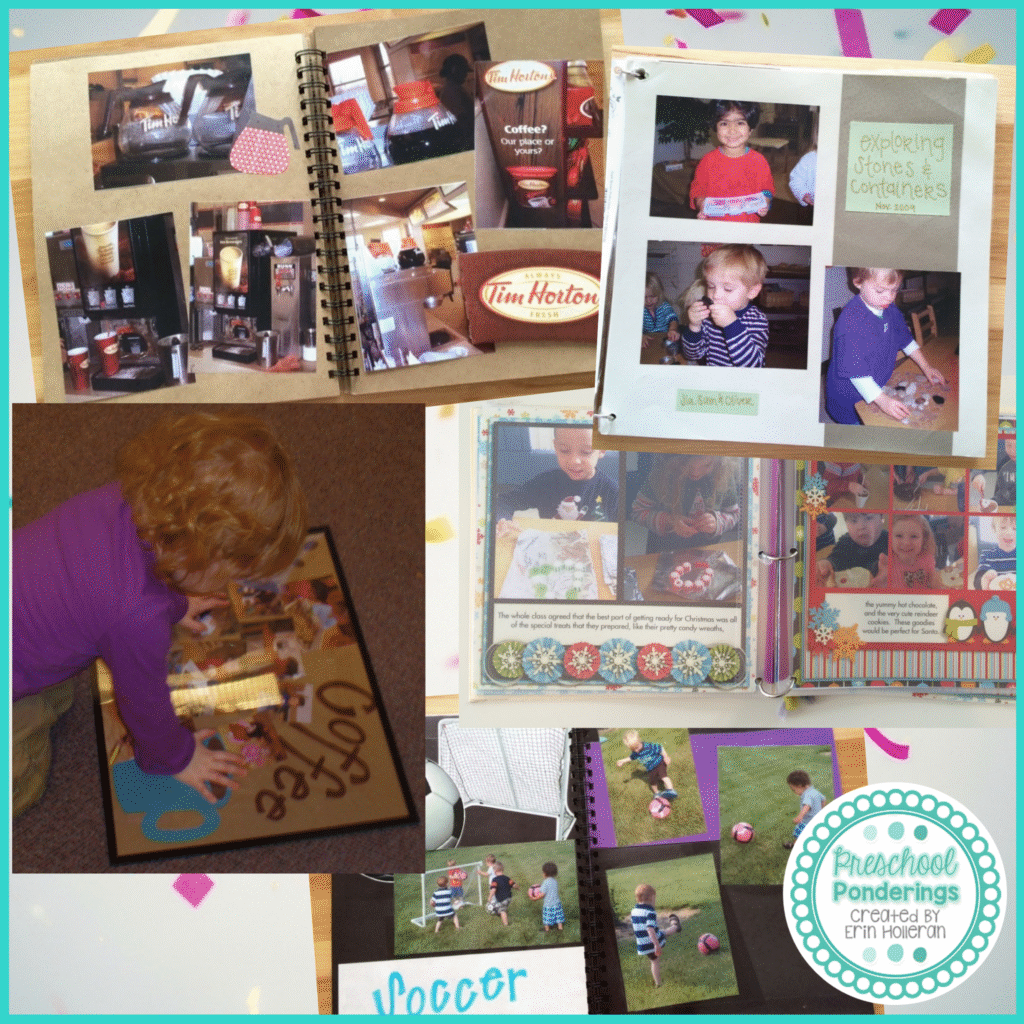
- Raw Documentation: this is any work that is created throughout the project, including children’s work samples, teacher’s notes and observations, and children’s artistic representations. The work shared in this class book is a perfect example of raw documentation because it was created by the children as a part of their investigation of holidays and traditions.
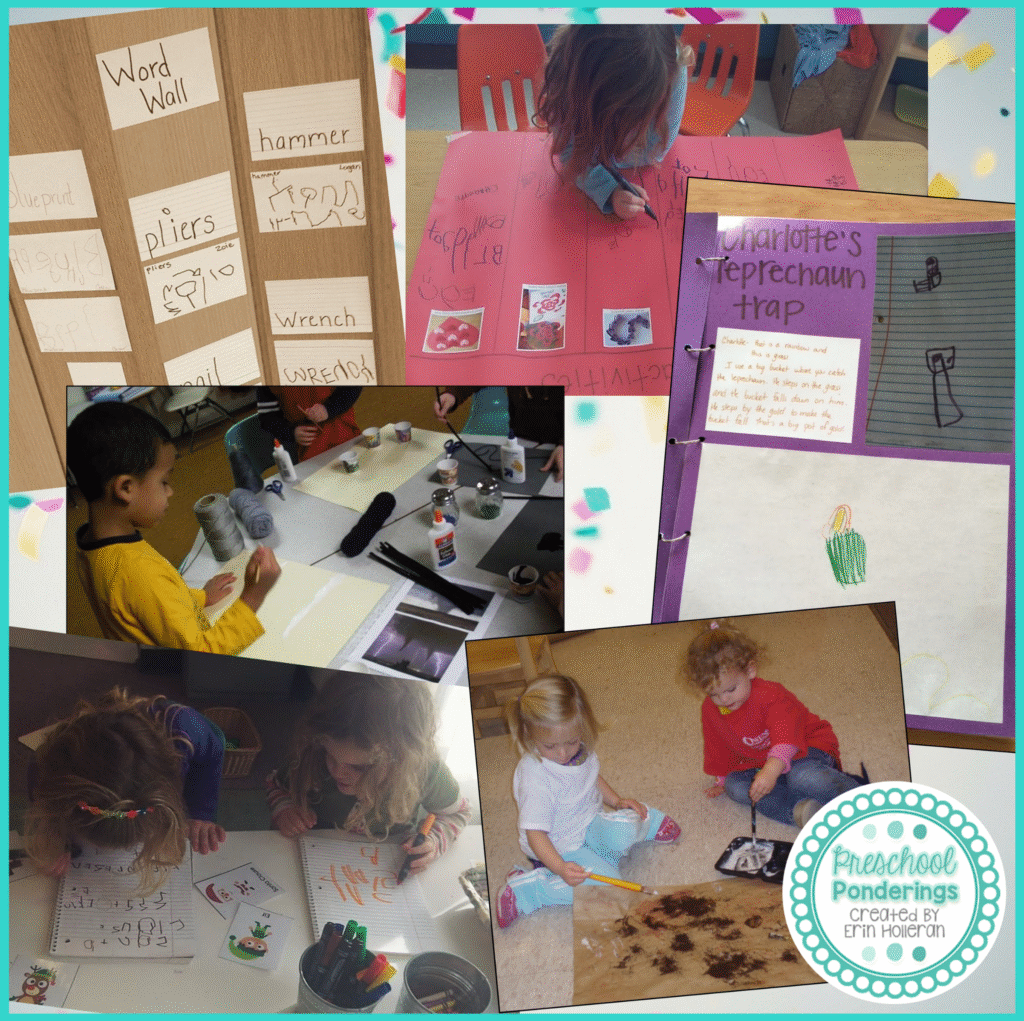
I like to add an additional category of documentation because I have found it to be especially successful with toddlers and young preschoolers. Photographs alone are incredibly important pieces of documentation when working with young children because they encourage conversation and verbal sharing of understanding and knowledge. In many instances, photo books and interactive scrapbooks are extremely helpful when telling the story of a specific experience. They help children focus on certain pieces of the experience, making sense of one before moving to the next.
Documentation is most valuable when many different forms of documentation are used together. When I post documentation I consider two distinct audiences; adults (parents, family members, lab students, school staff), and my students. I do things very different for each audience, because they respond to different kinds of documentation.
When I want to draw adults to documentation I place it at eye level for an adult. I am more likely to create panels for adult viewing, because I know that they will be able to make sense of what I write on the panel, I also know that they will appreciate the aesthetic look of a panel – clean, clearly organized, with an obvious message. Parents appreciate panels because they are easy to read, and with just the information that they have from my panel, they can start a conversation with their child about the activity that was documented on the panel. I often display raw documentation that I want adults to view, when I do I create a panel to go with it because it isn’t always easy to decipher children’s work. If I have a description of the work, with some photos of the children as they create it, then parents can easily discuss the work with their child knowledgeably.
When I display documentation that is specifically meant to encourage the children to talk about their work with each other I make sure to put it at their eye level. I also focus on photographs, any panels that I create specifically for the children will have very few words because the words don’t hold a lot of meaning for the children, they pictures do. I think that it is incredibly important to recognize the unique qualities of your class, and display documentation that is tailored to those qualities. One year I had a class that was constantly tearing my documentation off the wall. Before I gave up on posting documentation all together I spent some time watching what they were doing with the documentation. They were carrying it around the room and showing each other the pictures. I continued to post panels up high, for parents to see, but I stopped taping them low where the children could tear them off, instead, I made special photo pages, punched holes in the corners and attached them to binder rings. Then I put up special hooks for these pages, the children were free to take them off the hooks, carry them around, talk to each other about them, and when they were done, they returned them to the hooks.
My main goal when presenting documentation to my students is that the documentation be engaging. I want them to notice it and want to interact with it. The documentation serves it’s purpose if it helps the children reflect on their experiences and make sense of their knowledge, so it has to grab their attention. Something that has worked really well for me is class books. I also like to consider the ways that my audiences will receive documentation. When I’m displaying documentation for my students it is easy to share it with them during circle time, and then put it in the classroom for them to explore. When I create a new panel that I want parents to see I might decide to email it to all of the parents in my class because I know that most of my parents will check their email throughout the day.
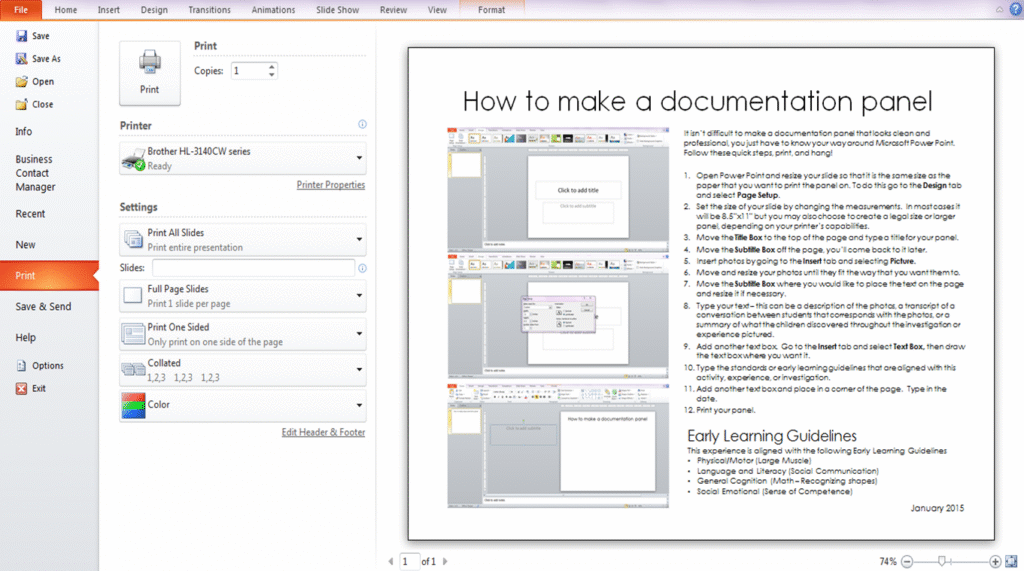
I create all of my documentation panels using Microsoft Power Point, this might seem kind of strange, but I’ve found that it gives me the most freedom when moving and manipulating photos and text. I’m going to walk you through how I do it – and I don’t do tutorials because I always miss a photo or an important step, so it must be pretty easy if I’m doing the tutorial!
I hope that my screenshots will make it easy for you to follow along, the first two steps are the most important, and the ones that I tend to forget, so if you can get these, the rest will be easy!
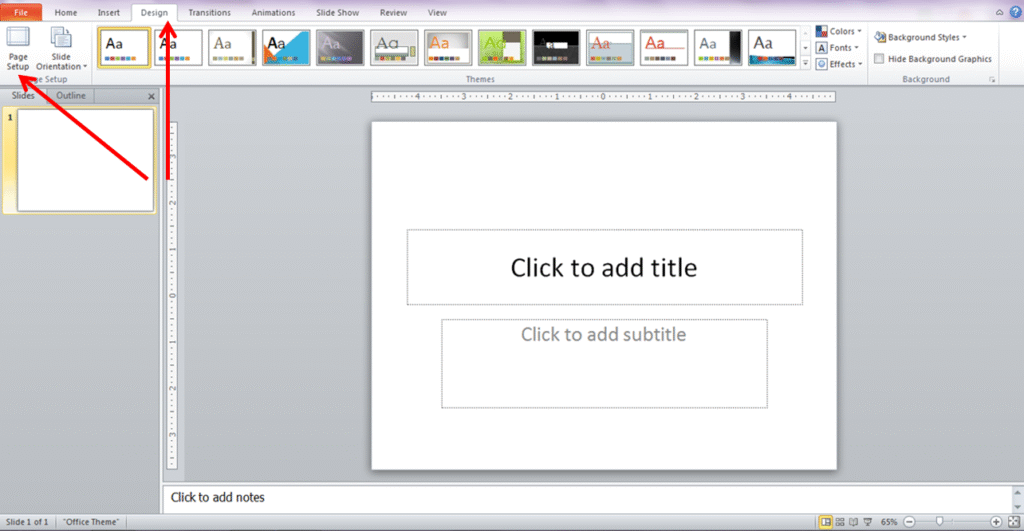
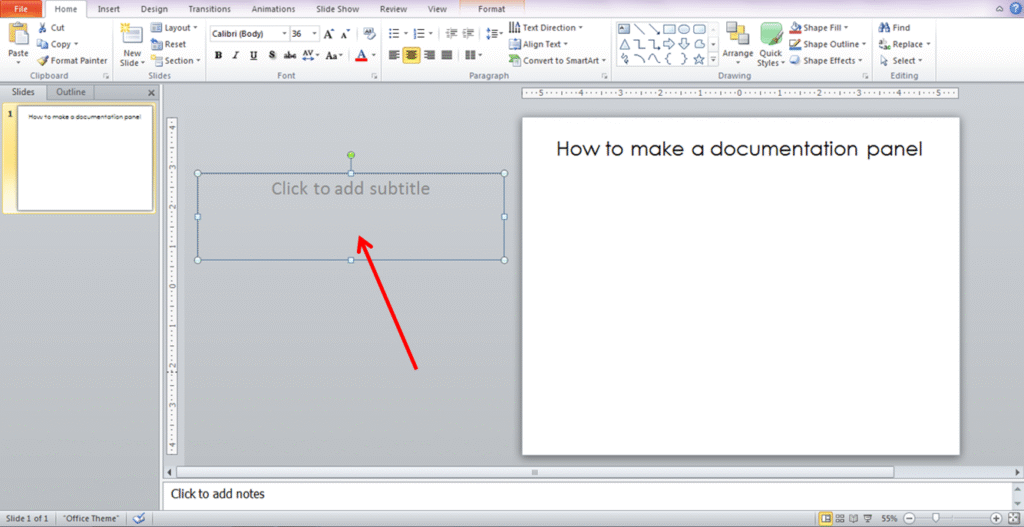
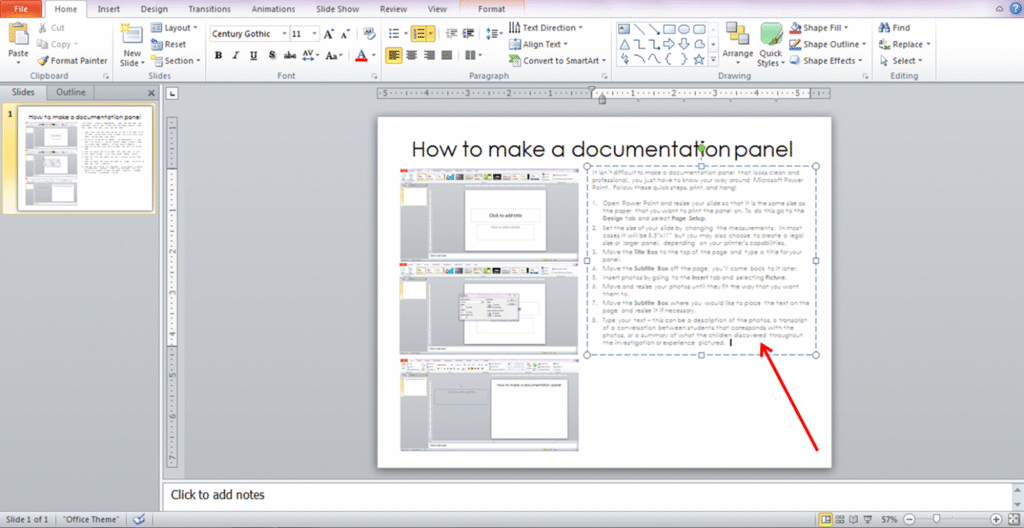
1. Open Power Point and re-size your slide so that it is the same size as the paper that you want to print the panel on. To do this go to the Design tab and select Page Setup.
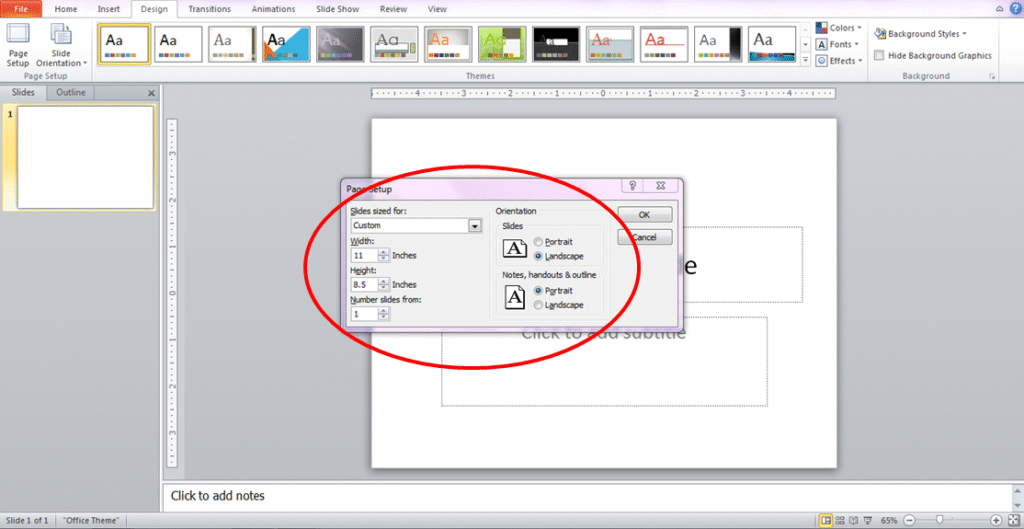
2. Set the size of your slide by changing the measurements. In most cases it will be 8.5”x11” but you may also choose to create a legal size or larger panel, depending on your printer’s capabilities.
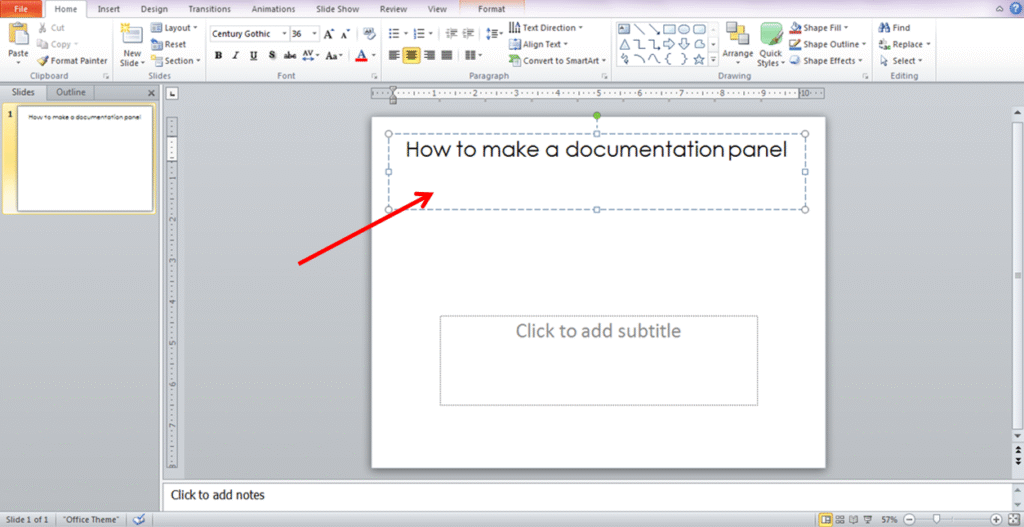
3. Move the Title Box to the top of the page and type a title for your panel.
4. Move the Subtitle Box off the page, you’ll come back to it later.
5. Insert photos by going to the Insert tab and selecting Picture.
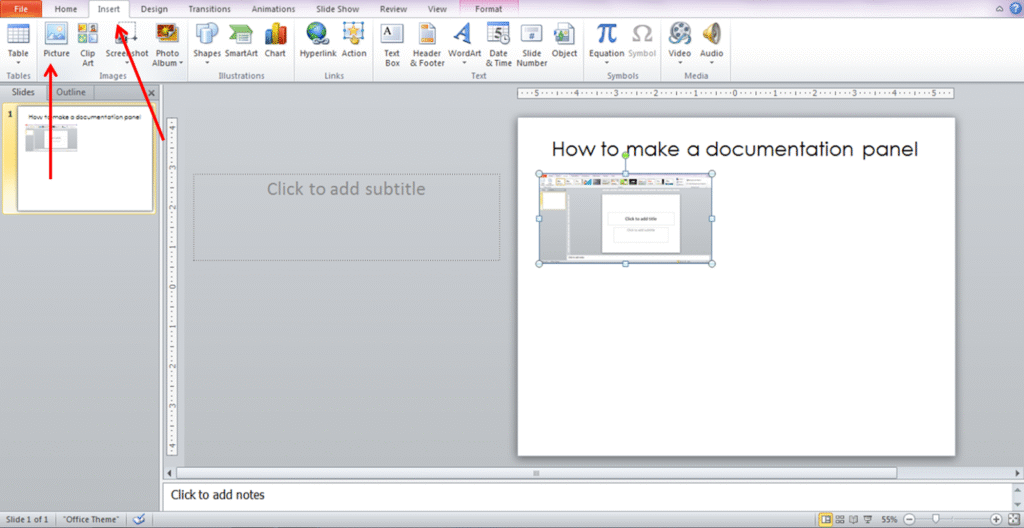
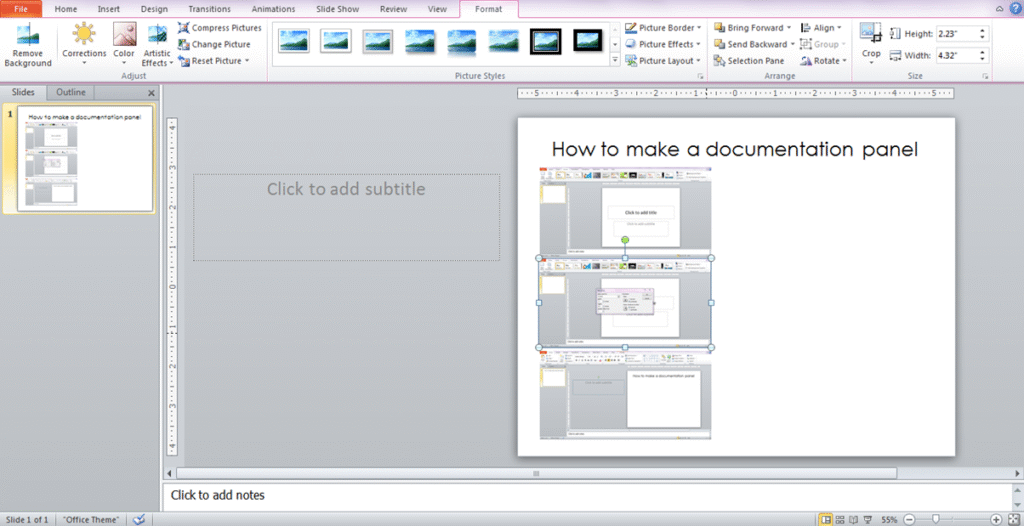
6. Move and re-size your photos until they fit the way that you want them to.
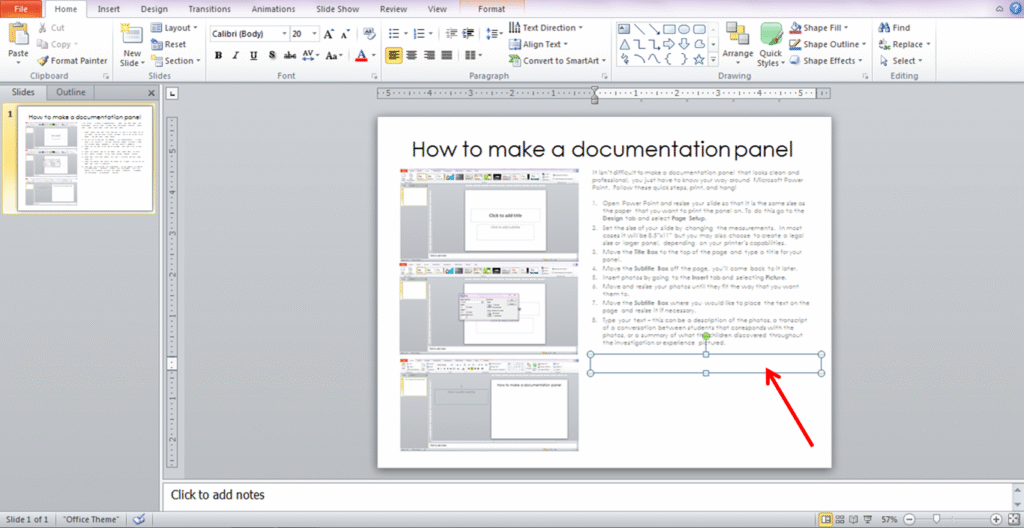
7. Move the Subtitle Box where you would like to place the text on the page and re-size it if necessary.
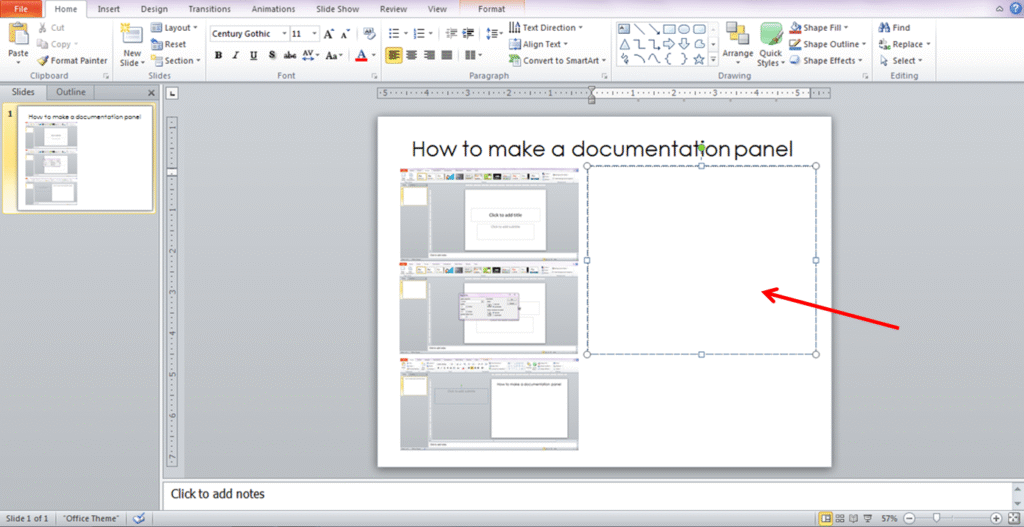
8. Type your text – this can be a description of the photos, a transcript of a conversation between students that corresponds with the photos, or a summary of what the children discovered throughout the investigation or experience pictured.
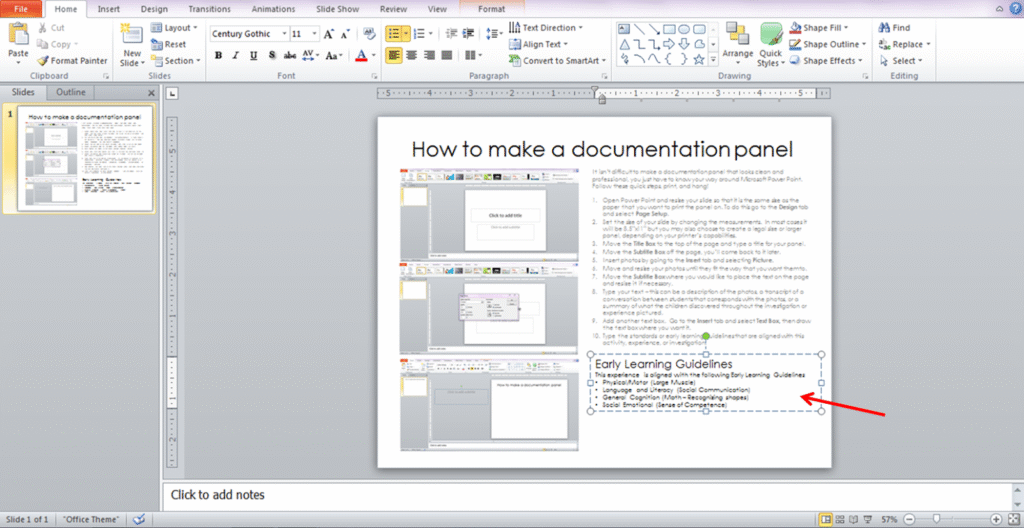
9. Add another text box. Go to the Insert tab and select Text Box, then draw the text box where you want it.
10. Type the standards or early learning guidelines that are aligned with this activity, experience, or investigation.
11. Add another text box and place in a corner of the page. Type in the date.
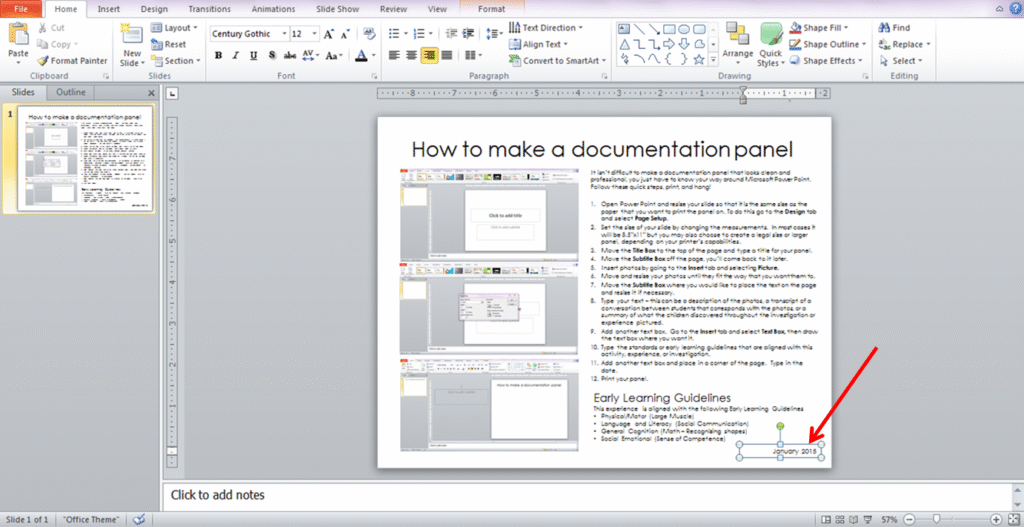
12. Print your panel.
See, I told you it was pretty easy. Now, what you’re going to put on the panel, that’s all up to you, but I do have a couple of tips;
- Use photos that really show the children learning – can you see the look on their face, or what their hands are doing? Those photos tell the story.
- Don’t feel pressure to include a photo of every child in your class, over time you will create many panels with many photos of many children, you will include them all over time. A panel is for those “Aha! Moments” and every child does not have the same enlightening moments at the same time, or during the same activity.
- Instead of simply describing the activity (that is what your lesson plans are for), write about how the children responded to the materials, the things that they said to each other, and the questions or exclamations that you heard throughout the experience. You could also write about the things that they said after the investigation was over.
- If you don’t want to spend a ton of time moving and sizing photos, you can use my Documentation Panel Templates, there are 8 templates with space for photos, titles, and text.
Documentation panels are great for so many different purposes, but it can be really difficult to find enough space to display all of them and your students’ artwork, especially when you don’t have a ton of wall space in the classroom. Over the years I’ve gotten pretty creative when it comes to displaying documentation, and of course, one of my favorite places for inspiration is Pinterest. I especially love documentation displays that could tie in with the project itself, using project related materials to display your documentation. If you want even more ideas, be sure to check out my Project Documentation Pinboard.


You May Also Like
